Apache Spark Structured Streaming Via Docker Compose

Building a data pipeline could be challenging especially when you have to take into account portability, flexibility, scalability etc. To overcome these challenges docker is one the well-known solution. In this article, we are gonna talk about building a data pipeline via docker-compose file.
0. Installation Processes
You are able to install all required components to realize this project using the given steps.
Installation of ROS
We won’t address the whole installation process of ROS but you can access all required info from ROS Noetic & Ubuntu 20.04 Installation.
Installation of Docker on Ubuntu
You can utilize this URL
Installation of Kafka-Python Library used for publishing data received from ROS to Kafka
❗ If you haven’t installed kafka-python, use the given command and then run given files.
pip install kafka-python
1. Prepare a robotic simulation environment
ROS (Robot Operating System)allows us to design a robotic environment. In this project, we will use ROS as a data provider. “odom” is a type of message that represents the position of a vehicle. We utilize the given code that generates arbitrary “odom” data and publishes them.
#!/usr/bin/env python3
import math
from math import sin, cos, pi
import rospy
import tf
from nav_msgs.msg import Odometry
from geometry_msgs.msg import Point, Pose, Quaternion, Twist, Vector3
rospy.init_node('odometry_publisher')
odom_pub = rospy.Publisher("odom", Odometry, queue_size=50)
odom_broadcaster = tf.TransformBroadcaster()
x = 0.0
y = 0.0
th = 0.0
vx = 0.1
vy = -0.1
vth = 0.1
current_time = rospy.Time.now()
last_time = rospy.Time.now()
r = rospy.Rate(1.0)
while not rospy.is_shutdown():
    current_time = rospy.Time.now()
    # compute odometry in a typical way given the velocities of the robot
    dt = (current_time - last_time).to_sec()
    delta_x = (vx * cos(th) - vy * sin(th)) * dt
    delta_y = (vx * sin(th) + vy * cos(th)) * dt
    delta_th = vth * dt
    x += delta_x
    y += delta_y
    th += delta_th
    # since all odometry is 6DOF we'll need a quaternion created from yaw
    odom_quat = tf.transformations.quaternion_from_euler(0, 0, th)
    # first, we'll publish the transform over tf
    odom_broadcaster.sendTransform(
        (x, y, 0.),
        odom_quat,
        current_time,
        "base_link",
        "odom"
    )
    # next, we'll publish the odometry message over ROS
    odom = Odometry()
    odom.header.stamp = current_time
    odom.header.frame_id = "odom"
    # set the position
    odom.pose.pose = Pose(Point(x, y, 0.), Quaternion(*odom_quat))
    # set the velocity
    odom.child_frame_id = "base_link"
    odom.twist.twist = Twist(Vector3(vx, vy, 0), Vector3(0, 0, vth))
    # publish the message
    odom_pub.publish(odom)
    last_time = current_time
    r.sleep()
Run the given code and analysis the data we will use
This script publishes odometry data with ROS “odom” topic. So, we can see the published data with the given command:
# run the script environment
python3 odomPublisher.py# check the topic to see data
rostopic echo /odom
In this use case, we will just interested the given part of the data:
position:
      x: -2.000055643960576
      y: -0.4997879642933192
      z: -0.0010013932644100873
    orientation:
      x: -1.3486164084605e-05
      y: 0.0038530870521455017
      z: 0.0016676819550213058
      w: 0.9999911861487526
2. Prepare Docker-Compose File
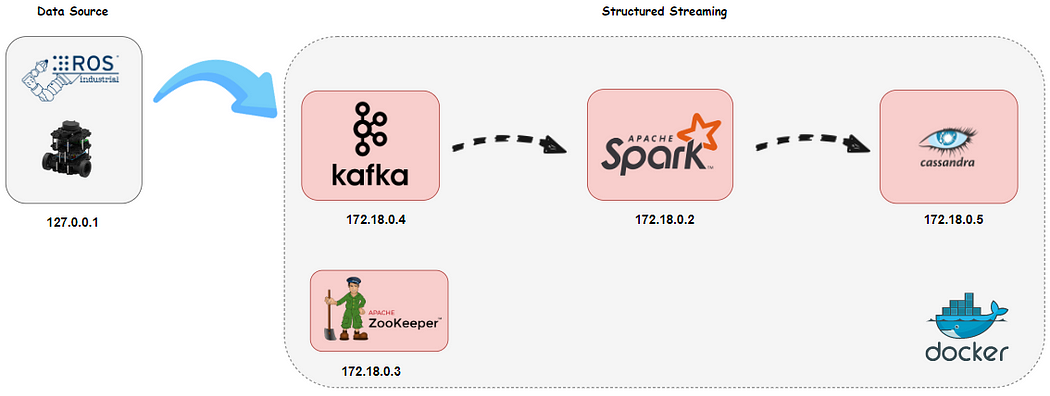
First of all, we generated a network called datapipeline for the architecture. The architecture consists of 4 services and each has a static IP address and uses the default port as the given below:
Spark: 172.18.0.2
Zookeeper: 172.18.0.3
Kafka: 172.18.0.4
Cassandra : 172.18.0.5
We use “volumes” to import our scripts to containers.
❗ You have to implement “ ../streamingProje:/home” part for your system.
You can access the docker-compose and replace your configs.
version: '3'
networks:
    datapipeline:
        driver: bridge
        ipam:
            driver: default
            config:
                - subnet: "172.18.0.0/16"

services:
  spark:
    image: docker.io/bitnami/spark:3
    container_name: spark_master
    hostname: spark_master
    user: root
    environment:
      - SPARK_MODE=master
      - SPARK_RPC_AUTHENTICATION_ENABLED=no
      - SPARK_RPC_ENCRYPTION_ENABLED=no
      - SPARK_LOCAL_STORAGE_ENCRYPTION_ENABLED=no
      - SPARK_SSL_ENABLED=no
    ports:
      - '8080:8080'
    volumes:
      - ../streamingProje:/home
      - /opt/spark/conf/spark-defaults.conf:/opt/bitnami/spark/conf/spark-defaults.conf
      - /opt/spark/jars:/opt/bitnami/spark/ivy:z
    networks:
      datapipeline:
        ipv4_address: 172.18.0.2
  zookeeper:
    image: 'bitnami/zookeeper:latest'
    container_name: zookeeper
    hostname: zookeeper
    ports:
      - '2181:2181'
    environment:
      - ALLOW_ANONYMOUS_LOGIN=yes
    networks:
      datapipeline:
        ipv4_address: 172.18.0.3
  kafka:
    image: 'bitnami/kafka:latest'
    container_name: kafka
    hostname: kafka
    ports:
      - '9092:9092'
    environment:
      - KAFKA_BROKER_ID=1
      - KAFKA_CFG_LISTENERS=PLAINTEXT://172.18.0.4:9092
      - KAFKA_CFG_ADVERTISED_LISTENERS=PLAINTEXT://172.18.0.4:9092
      - KAFKA_CFG_ZOOKEEPER_CONNECT=zookeeper:2181
      - ALLOW_PLAINTEXT_LISTENER=yes
    depends_on:
      - zookeeper
    volumes:
      - ../streamingProje:/home
    networks:
      datapipeline:
        ipv4_address: 172.18.0.4
  cassandra:
    image: 'bitnami/cassandra:latest'
    container_name: cassandra
    hostname: cassandra
    ports:
      - '9042:9042'
    volumes:
      - ../streamingProje:/home
    networks:
      datapipeline:
        ipv4_address: 172.18.0.5
3. Running docker-compose file
Open your workspace folder which includes all files provided and run the given command as below.
# run docker-compose file
docker-compose up
You will have a view like:

After all, container is running, you can set up your environment.
Prepare Kafka for Use Case
First of all, we will create a new Kafka topic namely odometry for ROS odom data using the given commands:
# Execute kafka container with container id given above
docker exec -it 1c31511ce206 bash# Create Kafka "odometry" topic for ROS odom data
kafka$ bin/kafka-topics.sh --create --topic odom --partitions 1 --replication-factor 1
-bootstrap-server localhost:9092
Check Kafka setup through Zookeeper
# Execute zookeeper container with container id given above
docker exec -it 1c31511ce206 bash# run command
opt/bitnami/zookeeper/bin/zkCli.sh -server localhost:2181
# list all brokers topic
ls /brokers/topics
You will have a view like:

Prepare Cassandra for Use Case
Initially, we will create a keyspace and then a topic in it using the given command:
# Execute cassandra container with container id given above
docker exec -it 1c31511ce206 bash

# Open the cqlsh
cqlsh -u cassandra -p cassandra# Run the command to create 'ros' keyspace

cqlsh> CREATE KEYSPACE ros WITH replication = {
'class':'SimpleStrategy',
'replication_factor' : 1};

# Then, run the command to create 'odometry' topic in 'ros'
cqlsh> create table ros.odometry(
        id int primary key,
        posex float,
        posey float,
        posez float,
        orientx float,
        orienty float,
        orientz float,
        orientw float);# Check your setup is correct
cqlsh> DESCRIBE ros.odometry
⚠️ The content of topic has to be the same as Spark schema: Be very careful here!
4. Prepare Apache Spark structured streaming
You are able to write analysis results to either console or Cassandra.
(First Way) Prepare Apache Spark Structured Streaming Pipeline Kafka to Cassandra
We will write a streaming script that reads odometry topics from Kafka, analyzes them, and then write results to Cassandra. We will use streamingKafka2Cassandra.py to do it.
First of all, we create a schema the same as we already defined in Cassandra.
⚠️ The content of schema has to be the same as Casssandra table: Be very careful here!
odometrySchema = StructType([
                StructField("id",IntegerType(),False),
                StructField("posex",FloatType(),False),
                StructField("posey",FloatType(),False),
                StructField("posez",FloatType(),False),
                StructField("orientx",FloatType(),False),
                StructField("orienty",FloatType(),False),
                StructField("orientz",FloatType(),False),
                StructField("orientw",FloatType(),False)
            ])
Then, we create a Spark Session and specify our config here:
spark = SparkSession \
    .builder \
    .appName("SparkStructuredStreaming") \
    .config("spark.cassandra.connection.host","172.18.0.5")\
    .config("spark.cassandra.connection.port","9042")\
    .config("spark.cassandra.auth.username","cassandra")\
    .config("spark.cassandra.auth.password","cassandra")\
    .config("spark.driver.host", "localhost")\
    .getOrCreate()
In order to read the Kafka stream, we use readStream() and specify Kafka configurations as the given below:
df = spark \
  .readStream \
  .format("kafka") \
  .option("kafka.bootstrap.servers", "172.18.0.4:9092") \
  .option("subscribe", "rosmsgs") \
  .option("delimeter",",") \
  .option("startingOffsets", "earliest") \
  .load()
Since Kafka sends data as binary, first we need to convert the binary value to String using selectExpr() as the given below:
df1 = df.selectExpr("CAST(value AS STRING)").select(from_json(col("value"),
odometrySchema).alias("data")).select("data.*")
df1.printSchema()
Although Apache Spark isn’t capable of directly writing stream data to Cassandra yet (using writeStream()), we can do it by use foreachBatch() as the given below:
def writeToCassandra(writeDF, _):
  writeDF.write \
    .format("org.apache.spark.sql.cassandra")\
    .mode('append')\
    .options(table="odometry", keyspace="ros")\
    .save()

df1.writeStream \
    .foreachBatch(writeToCassandra) \
    .outputMode("update") \
    .start()\
    .awaitTermination()
df1.show()
Finally, we got the given script streamingKafka2Cassandra.py:
from pyspark.sql import SparkSession
from pyspark.sql.types import StructType,StructField,FloatType,IntegerType
from pyspark.sql.functions import from_json,col
odometrySchema = StructType([
                StructField("id",IntegerType(),False),
                StructField("posex",FloatType(),False),
                StructField("posey",FloatType(),False),
                StructField("posez",FloatType(),False),
                StructField("orientx",FloatType(),False),
                StructField("orienty",FloatType(),False),
                StructField("orientz",FloatType(),False),
                StructField("orientw",FloatType(),False)
            ])
spark = SparkSession \
    .builder \
    .appName("SparkStructuredStreaming") \
    .config("spark.cassandra.connection.host","172.18.0.5")\
    .config("spark.cassandra.connection.port","9042")\
    .config("spark.cassandra.auth.username","cassandra")\
    .config("spark.cassandra.auth.password","cassandra")\
    .config("spark.driver.host", "localhost")\
    .getOrCreate()
spark.sparkContext.setLogLevel("ERROR")

df = spark \
  .readStream \
  .format("kafka") \
  .option("kafka.bootstrap.servers", "172.18.0.4:9092") \
  .option("subscribe", "rosmsgs") \
  .option("delimeter",",") \
  .option("startingOffsets", "earliest") \
  .load()
df.printSchema()
df1 = df.selectExpr("CAST(value AS STRING)").select(from_json(col("value"),
odometrySchema).alias("data")).select("data.*")
df1.printSchema()

def writeToCassandra(writeDF, _):
  writeDF.write \
    .format("org.apache.spark.sql.cassandra")\
    .mode('append')\
    .options(table="odometry", keyspace="ros")\
    .save()
df1.writeStream \
    .foreachBatch(writeToCassandra) \
    .outputMode("update") \
    .start()\
    .awaitTermination()
(Second Way) Prepare Apache Spark Structured Streaming Pipeline Kafka to Console
There are a few differences between writing to the console and writing to Cassandra. We directly write stream to console. With writeStream() we can write stream data directly to the console.
df1.writeStream \
  .outputMode("update") \
  .format("console") \
  .option("truncate", False) \
  .start() \
  .awaitTermination()
The rest of the process takes place in the same way as the previous one. Finally, we got the given script streamingKafka2Console.py:
from pyspark.sql import SparkSession
from pyspark.sql.types import StructType,StructField,IntegerType,FloatType
from pyspark.sql.functions import split,from_json,col
odometrySchema = StructType([
                StructField("id",IntegerType(),False),
                StructField("posex",FloatType(),False),
                StructField("posey",FloatType(),False),
                StructField("posez",FloatType(),False),
                StructField("orientx",FloatType(),False),
                StructField("orienty",FloatType(),False),
                StructField("orientz",FloatType(),False),
                StructField("orientw",FloatType(),False)
            ])
spark = SparkSession \
    .builder \
    .appName("SSKafka") \
    .config("spark.driver.host", "localhost")\
    .getOrCreate()
spark.sparkContext.setLogLevel("ERROR")
df = spark \
  .readStream \
  .format("kafka") \
  .option("kafka.bootstrap.servers", "172.18.0.4:9092") \
  .option("subscribe", "rosmsgs") \
  .option("delimeter",",") \
  .option("startingOffsets", "earliest") \
  .load()
df.printSchema()
df1 = df.selectExpr("CAST(value AS STRING)").select(from_json(col("value"),
odometrySchema).alias("data")).select("data.*")
df1.printSchema()
df1.writeStream \
  .outputMode("update") \
  .format("console") \
  .option("truncate", False) \
  .start() \
  .awaitTermination()
5. Demonstration & Results
If you are sure that all preparations are done, you can start a demo. You have to follow the given steps.
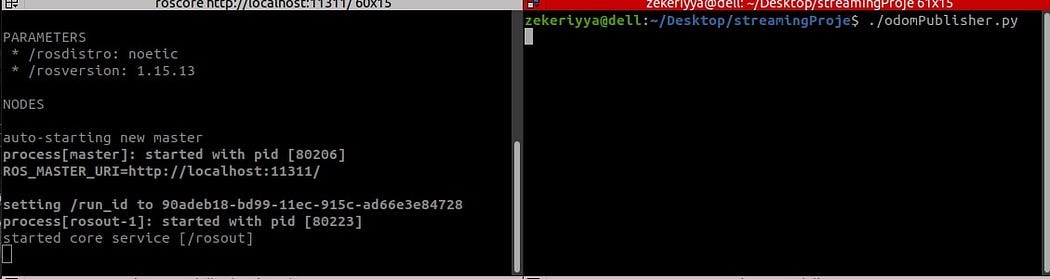
Start ROS and publish odom data to Kafka.
- roscore : starts ROS master
- odomPublisher.py : generates random odom data and publishes them along network
- ros2Kafka.py : subscribes odom topic and writes odom data into kafka container
# these all are implemented in your local pc
# open a terminal and start roscore
$ roscore# open another terminal and run odomPublisher.py
$ python3 odomPublisher.py
# open another terminal and run ros2Kafka.py
$ python3 ros2Kafka.py

(Option-1) Start Streaming to Console
# Execute spark container with container id given above
docker exec -it e3080e48085c bash# go to /home and run given command
spark-submit --packages
org.apache.spark:spark-sql-kafka-0-10_2.12:3.0.0 streamingKafka2Console.py
(Option-2) Start Streaming to Cassandra
# Execute spark container with container id given above
docker exec -it e3080e48085c bash# go to /home and run given command
spark-submit --packages
org.apache.spark:spark-sql-kafka-0-10_2.12:3.0.0,com.datastax.spark:spark-cassandra-connector_2.12:3.0.0 streamingKafka2Console.py
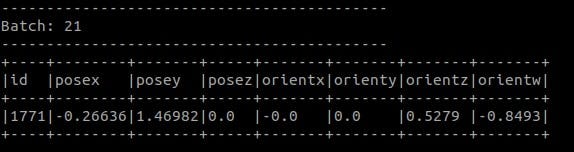
After the spark job is started, you can see the schema on the screen.

If you run option-1, you will have a view as the given below on your terminal screen.
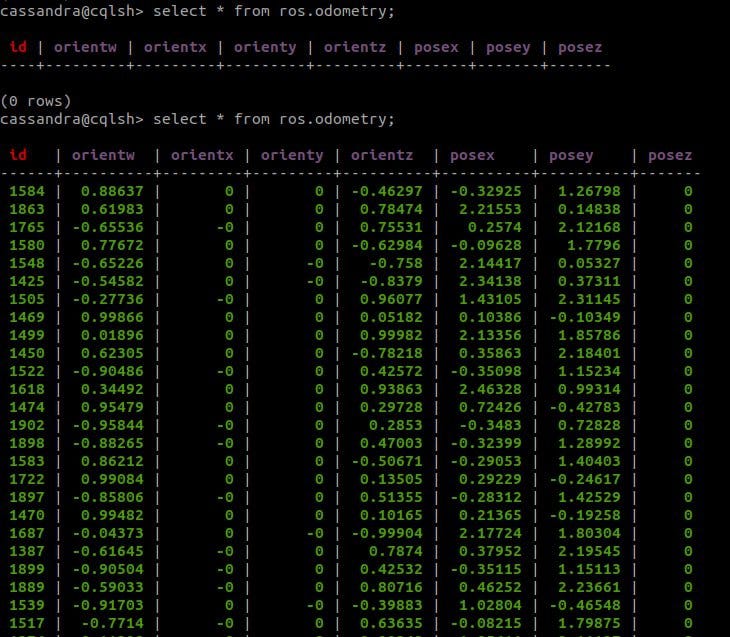
After all the process is done, we got the data in our Cassandra table as the given below:
You can query the given command to see your table:
# Open the cqlsh
cqlsh
# Then write select query to see content of the table
cqlsh> select * from ros.odometry