Docker Compose ile Apache Spark Yapılandırılmış Akış

Bir veri hattı oluşturmak, özellikle taşınabilirlik, esneklik, ölçeklenebilirlik vb. hususları göz önünde bulundurmanız gerektiğinde zorlayıcı olabilir. Bu zorlukların üstesinden gelmek için docker iyi bilinen bir çözümdür. Bu makalede, docker-compose dosyası aracılığıyla bir veri hattı oluşturma hakkında konuşacağız.
0. Installation Processes
Bu projeyi gerçekleştirmek için gerekli tüm bileşenleri verilen adımları kullanarak yükleyebilirsiniz.
Installation of ROS
ROS’un tüm kurulum sürecine değinmeyeceğiz, ancak gerekli tüm bilgilere şu adresten erişebilirsiniz ROS Noetic & Ubuntu 20.04 Kurulumu.
Installation of Docker on Ubuntu
Bunu kullanabilirsin URL
Installation of Kafka-Python Library used for publishing data received from ROS to Kafka
❗ Eğer yüklemediyseniz kafka-pythonverilen komutu kullanın ve ardından verilen dosyaları çalıştırın.
pip install kafka-python
1. Prepare a robotic simulation environment
ROS (Robot İşletim Sistemi)robotik bir ortam tasarlamamızı sağlar. Bu projede veri sağlayıcı olarak ROS’u kullanacağız. “odom” bir aracın konumunu temsil eden bir mesaj türüdür. Rastgele “odom” verileri üreten ve bunları yayınlayan verilen kodu kullanıyoruz.
#!/usr/bin/env python3
import math
from math import sin, cos, pi
import rospy
import tf
from nav_msgs.msg import Odometry
from geometry_msgs.msg import Point, Pose, Quaternion, Twist, Vector3
rospy.init_node('odometry_publisher')
odom_pub = rospy.Publisher("odom", Odometry, queue_size=50)
odom_broadcaster = tf.TransformBroadcaster()
x = 0.0
y = 0.0
th = 0.0
vx = 0.1
vy = -0.1
vth = 0.1
current_time = rospy.Time.now()
last_time = rospy.Time.now()
r = rospy.Rate(1.0)
while not rospy.is_shutdown():
    current_time = rospy.Time.now()
    # compute odometry in a typical way given the velocities of the robot
    dt = (current_time - last_time).to_sec()
    delta_x = (vx * cos(th) - vy * sin(th)) * dt
    delta_y = (vx * sin(th) + vy * cos(th)) * dt
    delta_th = vth * dt
    x += delta_x
    y += delta_y
    th += delta_th
    # since all odometry is 6DOF we'll need a quaternion created from yaw
    odom_quat = tf.transformations.quaternion_from_euler(0, 0, th)
    # first, we'll publish the transform over tf
    odom_broadcaster.sendTransform(
        (x, y, 0.),
        odom_quat,
        current_time,
        "base_link",
        "odom"
    )
    # next, we'll publish the odometry message over ROS
    odom = Odometry()
    odom.header.stamp = current_time
    odom.header.frame_id = "odom"
    # set the position
    odom.pose.pose = Pose(Point(x, y, 0.), Quaternion(*odom_quat))
    # set the velocity
    odom.child_frame_id = "base_link"
    odom.twist.twist = Twist(Vector3(vx, vy, 0), Vector3(0, 0, vth))
    # publish the message
    odom_pub.publish(odom)
    last_time = current_time
    r.sleep()
Run the given code and analysis the data we will use
Bu betik odometri verilerini ROS “odom” başlığı ile yayınlar. Böylece, yayınlanan verileri verilen komutla görebiliriz:
# run the script environment
python3 odomPublisher.py# check the topic to see data
rostopic echo /odom
Bu kullanım durumunda, verilerin sadece verilen kısmıyla ilgileneceğiz:
position:
      x: -2.000055643960576
      y: -0.4997879642933192
      z: -0.0010013932644100873
    orientation:
      x: -1.3486164084605e-05
      y: 0.0038530870521455017
      z: 0.0016676819550213058
      w: 0.9999911861487526
2. Prepare Docker-Compose File
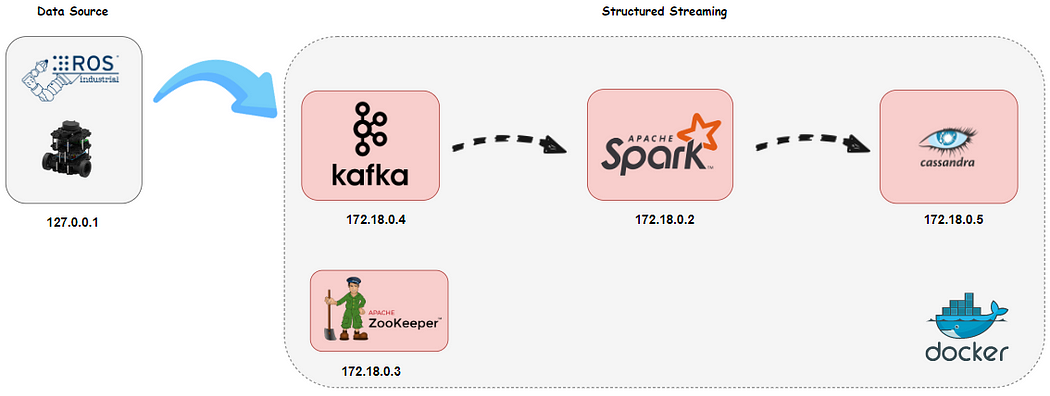
Öncelikle mimari için datapipeline adında bir ağ oluşturduk. Mimari 4 servisten oluşuyor ve her birinin statik bir IP adresi var ve aşağıda verildiği gibi varsayılan portu kullanıyor:
Kıvılcım: 172.18.0.2
Zookeeper: 172.18.0.3
Kafka: 172.18.0.4
Cassandra: 172.18.0.5
Komut dosyalarımızı konteynerlere aktarmak için “volumes” kullanıyoruz.
❗ Sisteminiz için ” ../streamingProje:/home” kısmını uygulamanız gerekir.
Şu adrese erişebilirsiniz docker-compose ve yapılandırmalarınızı değiştirin.
version: '3'
networks:
    datapipeline:
        driver: bridge
        ipam:
            driver: default
            config:
                - subnet: "172.18.0.0/16"

services:
  spark:
    image: docker.io/bitnami/spark:3
    container_name: spark_master
    hostname: spark_master
    user: root
    environment:
      - SPARK_MODE=master
      - SPARK_RPC_AUTHENTICATION_ENABLED=no
      - SPARK_RPC_ENCRYPTION_ENABLED=no
      - SPARK_LOCAL_STORAGE_ENCRYPTION_ENABLED=no
      - SPARK_SSL_ENABLED=no
    ports:
      - '8080:8080'
    volumes:
      - ../streamingProje:/home
      - /opt/spark/conf/spark-defaults.conf:/opt/bitnami/spark/conf/spark-defaults.conf
      - /opt/spark/jars:/opt/bitnami/spark/ivy:z
    networks:
      datapipeline:
        ipv4_address: 172.18.0.2
  zookeeper:
    image: 'bitnami/zookeeper:latest'
    container_name: zookeeper
    hostname: zookeeper
    ports:
      - '2181:2181'
    environment:
      - ALLOW_ANONYMOUS_LOGIN=yes
    networks:
      datapipeline:
        ipv4_address: 172.18.0.3
  kafka:
    image: 'bitnami/kafka:latest'
    container_name: kafka
    hostname: kafka
    ports:
      - '9092:9092'
    environment:
      - KAFKA_BROKER_ID=1
      - KAFKA_CFG_LISTENERS=PLAINTEXT://172.18.0.4:9092
      - KAFKA_CFG_ADVERTISED_LISTENERS=PLAINTEXT://172.18.0.4:9092
      - KAFKA_CFG_ZOOKEEPER_CONNECT=zookeeper:2181
      - ALLOW_PLAINTEXT_LISTENER=yes
    depends_on:
      - zookeeper
    volumes:
      - ../streamingProje:/home
    networks:
      datapipeline:
        ipv4_address: 172.18.0.4
  cassandra:
    image: 'bitnami/cassandra:latest'
    container_name: cassandra
    hostname: cassandra
    ports:
      - '9042:9042'
    volumes:
      - ../streamingProje:/home
    networks:
      datapipeline:
        ipv4_address: 172.18.0.5
3. Running docker-compose file
Sağlanan tüm dosyaları içeren çalışma alanı klasörünüzü açın ve verilen komutu aşağıdaki gibi çalıştırın.
# run docker-compose file
docker-compose up
Şöyle bir manzaraya sahip olacaksınız:

Sonuçta, konteyner çalışıyor, ortamınızı kurabilirsiniz.
Prepare Kafka for Use Case
Öncelikle verilen komutları kullanarak ROS odom verileri için odometry adında yeni bir Kafka konusu oluşturacağız:
# Execute kafka container with container id given above
docker exec -it 1c31511ce206 bash# Create Kafka "odometry" topic for ROS odom data
kafka$ bin/kafka-topics.sh --create --topic odom --partitions 1 --replication-factor 1
-bootstrap-server localhost:9092
Check Kafka setup through Zookeeper
# Execute zookeeper container with container id given above
docker exec -it 1c31511ce206 bash# run command
opt/bitnami/zookeeper/bin/zkCli.sh -server localhost:2181
# list all brokers topic
ls /brokers/topics
Şöyle bir manzaraya sahip olacaksınız:

Prepare Cassandra for Use Case
İlk olarak, verilen komutu kullanarak bir anahtar alanı ve ardından içinde bir konu oluşturacağız:
# Execute cassandra container with container id given above
docker exec -it 1c31511ce206 bash

# Open the cqlsh
cqlsh -u cassandra -p cassandra# Run the command to create 'ros' keyspace

cqlsh> CREATE KEYSPACE ros WITH replication = {
'class':'SimpleStrategy',
'replication_factor' : 1};

# Then, run the command to create 'odometry' topic in 'ros'
cqlsh> create table ros.odometry(
        id int primary key,
        posex float,
        posey float,
        posez float,
        orientx float,
        orienty float,
        orientz float,
        orientw float);# Check your setup is correct
cqlsh> DESCRIBE ros.odometry
⚠️ Konunun içeriği Spark şeması ile aynı olmalıdır: Burada çok dikkatli olun!
4. Prepare Apache Spark structured streaming
Analiz sonuçlarını konsola ya da Cassandra’ya yazabilirsiniz.
(First Way) Prepare Apache Spark Structured Streaming Pipeline Kafka to Cassandra
Odometri konularını Kafka’dan okuyan, analiz eden ve ardından sonuçları Cassandra’ya yazan bir akış betiği yazacağız. Kullanacağımız streamingKafka2Cassandra.py bunu yapmak için.
Öncelikle, Cassandra’da daha önce tanımladığımız gibi bir şema oluşturuyoruz.
⚠️ Şema içeriği Casssandra tablosu ile aynı olmalıdır: Burada çok dikkatli olun!
odometrySchema = StructType([
                StructField("id",IntegerType(),False),
                StructField("posex",FloatType(),False),
                StructField("posey",FloatType(),False),
                StructField("posez",FloatType(),False),
                StructField("orientx",FloatType(),False),
                StructField("orienty",FloatType(),False),
                StructField("orientz",FloatType(),False),
                StructField("orientw",FloatType(),False)
            ])
Ardından, bir Spark Oturumu oluşturuyoruz ve yapılandırmamızı burada belirtiyoruz:
spark = SparkSession \
    .builder \
    .appName("SparkStructuredStreaming") \
    .config("spark.cassandra.connection.host","172.18.0.5")\
    .config("spark.cassandra.connection.port","9042")\
    .config("spark.cassandra.auth.username","cassandra")\
    .config("spark.cassandra.auth.password","cassandra")\
    .config("spark.driver.host", "localhost")\
    .getOrCreate()
Kafka akışını okumak için readStream() kullanıyoruz ve Kafka konfigürasyonlarını aşağıda verildiği gibi belirliyoruz:
df = spark \
  .readStream \
  .format("kafka") \
  .option("kafka.bootstrap.servers", "172.18.0.4:9092") \
  .option("subscribe", "rosmsgs") \
  .option("delimeter",",") \
  .option("startingOffsets", "earliest") \
  .load()
Kafka verileri binary olarak gönderdiğinden, öncelikle aşağıda verildiği gibi selectExpr() kullanarak binary değeri String’e dönüştürmemiz gerekir:
df1 = df.selectExpr("CAST(value AS STRING)").select(from_json(col("value"),
odometrySchema).alias("data")).select("data.*")
df1.printSchema()
Apache Spark henüz akış verilerini doğrudan Cassandra’ya yazma yeteneğine sahip olmasa da (writeStream() kullanarak), foreachBatch() kullanarak bunu aşağıda verildiği gibi yapabiliriz:
def writeToCassandra(writeDF, _):
  writeDF.write \
    .format("org.apache.spark.sql.cassandra")\
    .mode('append')\
    .options(table="odometry", keyspace="ros")\
    .save()

df1.writeStream \
    .foreachBatch(writeToCassandra) \
    .outputMode("update") \
    .start()\
    .awaitTermination()
df1.show()
Son olarak, verilen komut dosyasını elde ettik streamingKafka2Cassandra.py:
from pyspark.sql import SparkSession
from pyspark.sql.types import StructType,StructField,FloatType,IntegerType
from pyspark.sql.functions import from_json,col
odometrySchema = StructType([
                StructField("id",IntegerType(),False),
                StructField("posex",FloatType(),False),
                StructField("posey",FloatType(),False),
                StructField("posez",FloatType(),False),
                StructField("orientx",FloatType(),False),
                StructField("orienty",FloatType(),False),
                StructField("orientz",FloatType(),False),
                StructField("orientw",FloatType(),False)
            ])
spark = SparkSession \
    .builder \
    .appName("SparkStructuredStreaming") \
    .config("spark.cassandra.connection.host","172.18.0.5")\
    .config("spark.cassandra.connection.port","9042")\
    .config("spark.cassandra.auth.username","cassandra")\
    .config("spark.cassandra.auth.password","cassandra")\
    .config("spark.driver.host", "localhost")\
    .getOrCreate()
spark.sparkContext.setLogLevel("ERROR")

df = spark \
  .readStream \
  .format("kafka") \
  .option("kafka.bootstrap.servers", "172.18.0.4:9092") \
  .option("subscribe", "rosmsgs") \
  .option("delimeter",",") \
  .option("startingOffsets", "earliest") \
  .load()
df.printSchema()
df1 = df.selectExpr("CAST(value AS STRING)").select(from_json(col("value"),
odometrySchema).alias("data")).select("data.*")
df1.printSchema()

def writeToCassandra(writeDF, _):
  writeDF.write \
    .format("org.apache.spark.sql.cassandra")\
    .mode('append')\
    .options(table="odometry", keyspace="ros")\
    .save()
df1.writeStream \
    .foreachBatch(writeToCassandra) \
    .outputMode("update") \
    .start()\
    .awaitTermination()
(Second Way) Prepare Apache Spark Structured Streaming Pipeline Kafka to Console
Konsola yazmak ile Cassandra’ya yazmak arasında birkaç fark vardır. Akışı doğrudan konsola yazıyoruz. writeStream() ile akış verilerini doğrudan konsola yazabiliriz.
df1.writeStream \
  .outputMode("update") \
  .format("console") \
  .option("truncate", False) \
  .start() \
  .awaitTermination()
Sürecin geri kalanı bir öncekiyle aynı şekilde gerçekleşir. Son olarak, verilen komut dosyasını elde ettik streamingKafka2Console.py:
from pyspark.sql import SparkSession
from pyspark.sql.types import StructType,StructField,IntegerType,FloatType
from pyspark.sql.functions import split,from_json,col
odometrySchema = StructType([
                StructField("id",IntegerType(),False),
                StructField("posex",FloatType(),False),
                StructField("posey",FloatType(),False),
                StructField("posez",FloatType(),False),
                StructField("orientx",FloatType(),False),
                StructField("orienty",FloatType(),False),
                StructField("orientz",FloatType(),False),
                StructField("orientw",FloatType(),False)
            ])
spark = SparkSession \
    .builder \
    .appName("SSKafka") \
    .config("spark.driver.host", "localhost")\
    .getOrCreate()
spark.sparkContext.setLogLevel("ERROR")
df = spark \
  .readStream \
  .format("kafka") \
  .option("kafka.bootstrap.servers", "172.18.0.4:9092") \
  .option("subscribe", "rosmsgs") \
  .option("delimeter",",") \
  .option("startingOffsets", "earliest") \
  .load()
df.printSchema()
df1 = df.selectExpr("CAST(value AS STRING)").select(from_json(col("value"),
odometrySchema).alias("data")).select("data.*")
df1.printSchema()
df1.writeStream \
  .outputMode("update") \
  .format("console") \
  .option("truncate", False) \
  .start() \
  .awaitTermination()
5. Demonstration & Results
Tüm hazırlıkların tamamlandığından eminseniz, bir demo başlatabilirsiniz. Verilen adımları takip etmelisiniz.
Start ROS and publish odom data to Kafka.
- roscore : ROS master’ı başlatır
- odomPublisher.py : rastgele odom verileri üretir ve bunları ağ boyunca yayınlar
- ros2Kafka.py : odom konusuna abone olur ve odom verilerini kafka konteynerine yazar
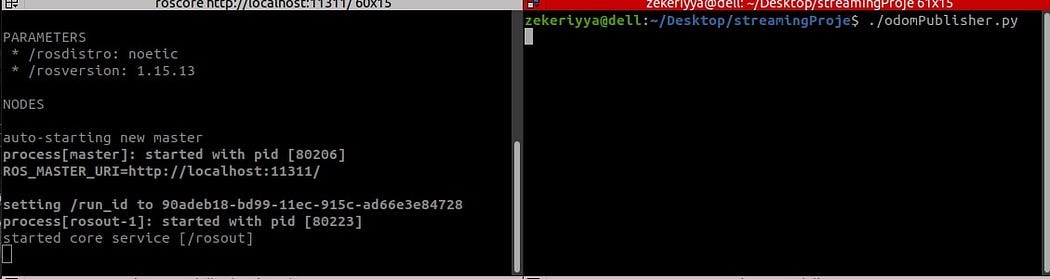
# these all are implemented in your local pc
# open a terminal and start roscore
$ roscore# open another terminal and run odomPublisher.py
$ python3 odomPublisher.py
# open another terminal and run ros2Kafka.py
$ python3 ros2Kafka.py

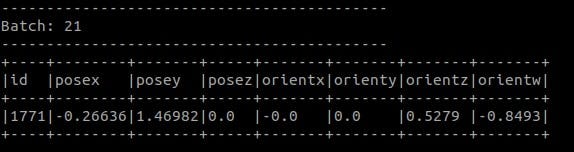
(Option-1) Start Streaming to Console
# Execute spark container with container id given above
docker exec -it e3080e48085c bash# go to /home and run given command
spark-submit --packages
org.apache.spark:spark-sql-kafka-0-10_2.12:3.0.0 streamingKafka2Console.py
(Option-2) Start Streaming to Cassandra
# Execute spark container with container id given above
docker exec -it e3080e48085c bash# go to /home and run given command
spark-submit --packages
org.apache.spark:spark-sql-kafka-0-10_2.12:3.0.0,com.datastax.spark:spark-cassandra-connector_2.12:3.0.0 streamingKafka2Console.py
Spark işi başlatıldıktan sonra ekranda şemayı görebilirsiniz.

Seçenek-1’i çalıştırırsanız, terminal ekranınızda aşağıdaki gibi bir görünüm elde edersiniz.
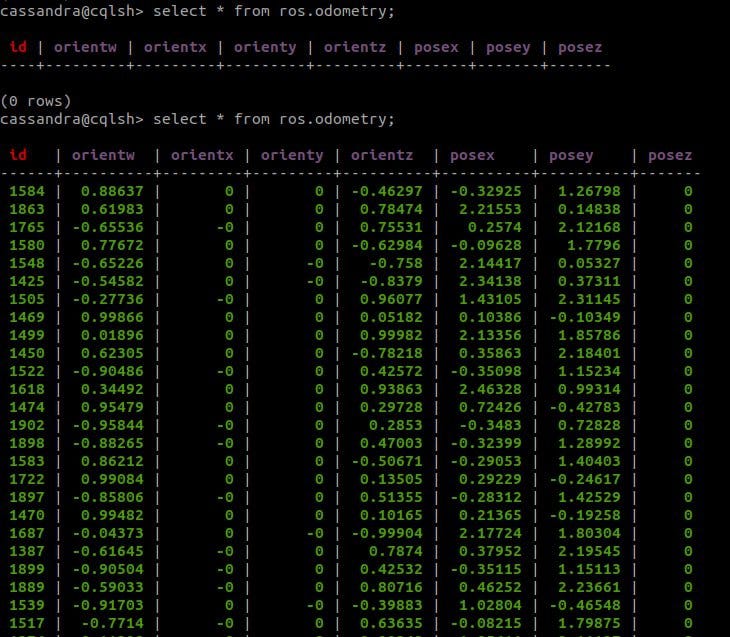
Tüm işlemler tamamlandıktan sonra, Cassandra tablomuzdaki verileri aşağıda verildiği gibi aldık:
Tablonuzu görmek için verilen komutu sorgulayabilirsiniz:
# Open the cqlsh
cqlsh
# Then write select query to see content of the table
cqlsh> select * from ros.odometry